Simple Variegated Crop Top
- Oct 18, 2022
- 3 min read
Updated: Oct 31, 2022
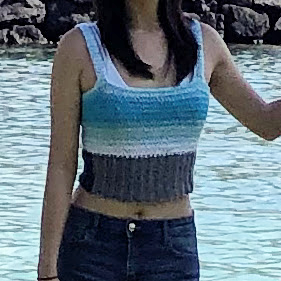
This stylish crop top is the perfect crochet staple for your spring & summer wardrobe. It's super beginner-friendly (the only stitch you need is half double crochet!) and quick to work up. The simple pattern really lets the colors of the variegated yarn shine.


Materials:
Light (#3) variegated yarn: approx. 240/290/340/400 yd
I'm a big believer in the versatility of yarn; as long as you can achieve or adjust the gauge and the quality, drape, etc. of the fabric is to your liking, feel free to substitute with any yarn you like! Since this top is meant to be form-fitting, though, I would recommend using an acrylic, merino, or cotton-acrylic blend yarn. Personally, I used Caron Skinny Cakes yarn in the Pop Rock color.
Size H (5mm) hook, or hook needed to obtain gauge
Yarn needle
Scissors
Stitch markers
Safety pins
Measurements:
XS: Fits 32-34" Bust, 24-26" Waist; Top Length (not including straps): 10"
S: Fits 34-36" Bust, 26-28" Waist; Top Length (not including straps): 10.5"
M: Fits 36-38" Bust, 28-30" Waist; Top Length (not including straps): 11"
L: Fits 38-40" Bust, 30-32" Waist; Top Length (not including straps): 11.5"
If you are between sizes, I recommend you size down, since this top is meant to be form-fitting. If you'd prefer a looser fit, however, feel free to size up!
Gauge:
3" square = 12 stitches x 12.5 rows in hdc
Stitches & Abbreviations:
ch = chain
hdc = half double crochet
st(s) = stitch(es)
BLO = back loop only
inc = increase
hdc2tog = hdc decrease
sl st = slip stitch
Notes:
-This pattern is written in US crochet terms.
-Turning ch 1 does not count as a stitch.
-"10 hdc" means 1 hdc in the next 10 stitches.
-This pattern is written in sizes XS/S/M/L (e.g.: "5/7/9/11 hdc" means 5 hdc for XS, 7 hdc for S, 9 hdc for M, and 11 hdc for L). If there is only one number, it applies to all sizes.
-Model is 5'3" with a 33" bust and 24" waist; model is wearing size XS.
Pattern
Body Ribbing:
Foundation: Make a slip knot, then ch 21/22/23/24
R1: 1 hdc in 2nd ch from hook and each ch across, turn (20/21/22/23)
R2-66/70/74/78: Ch 1, 1 hdc BLO in each st until last st, 1 hdc, turn (20/21/22/23)
Do not fasten off. Proceed to work along the long edge of the ribbing band. Each row equals 1 st.
Body:
R1: Ch 1, 1 hdc inc, 1 hdc in each st until last st, 1 hdc inc, turn (68/72/76/80)
R2: Ch 1, *1 hdc inc, 1 hdc*, repeat * to * until end, turn (102/108/114/120)
R3-5: Ch 1, 102/108/114/120 hdc, turn (102/108/114/120)
For size XS only:
R6: Ch 1, (24 hdc, 1 hdc inc, 25 hdc, 1 hdc inc)*2, turn (106)
For size S only:
R6: Ch 1, (26 hdc, 1 hdc inc)*4, turn (112)
For size M only:
R6: Ch 1, (18 hdc, 1 hdc inc)*6, turn (120)
For size L only:
R6: Ch 1, (19 hdc, 1 hdc inc)*6, turn (126)
All sizes:
R7-16: Ch 1, 1 hdc in each st, turn (106/112/120/126)
For size XS only:
R17: Ch 1, (24 hdc, 1 hdc2tog, 25 hdc, 1 hdc2tog)*2, turn (102)
For size S only:
R17: Ch 1, (26 hdc, 1 hdc2tog)*4, turn (108)
For size M only:
R17: Ch 1, (18 hdc, 1 hdc2tog)*6, turn (114)
For size L only:
R17: Ch 1, (19 hdc, 1 hdc2tog)*6, turn (120)
All sizes:
R18-24/25/26/28: Ch 1, 1 hdc in each st, turn (102/108/114/120)
Final Row: Ch 1, 1 sl st in each st (102/108/114/120). Keep sl sts loose so that the top can stretch.
Fasten off, leaving a long tail. Fold the body panel in half with the wrong side (bumpy sl sts) facing you. Using the tail, whip stitch the sides of the top together, threading into the back loops of the ribbing only.
Straps (make 2):
Foundation: Make a slip knot, leaving a 6" tail, then ch 6
R1: 1 hdc in 2nd ch from hook and each ch across, turn (5)
R2-36/37/38/39: Ch 1, 1 hdc in each st, turn (5)
Fasten off, leaving a 6” tail. Each strap should measure 9.5”/9.75"/10"/10.25".
Assembly:
Try on the top with a bra, then pin the straps in place; the straps should fit snugly, as they will stretch out over time. When satisfied, sew the straps to the top with the wrong side of the top facing out. For a neat finish, insert your needle through the tops of the last row of hdcs on the body of the top, not into the sl st edging.
Fasten off, weave in all ends, and you're done!


Did you like this pattern? Let me know if you have any questions or comments down below!

Comments